Mengatasi dimensi AUTOCAD yg bertanda seru


Hello guys, ketemu lagi ama gw si admin ganteng, kali ini ane akan mengungkap sebuah rahasia penyebab dan cara memperbaiki gambar kerja kita yang bermasalah dengan notifikasi warning pada ujung dimensi autoCAD, 

sebenernya ini gak terlalu masalah dih pada gambar kerja, namun yang nyebelin ini ngeganggu di mate, yup jadi ngerusak pemandangan workspace autoCAD itu sendiri, 

oke langsung aja caraengatasinya iyalah,dengan mengetik Command: ANNOMONITOR (kemudian tekan enter)

ketikan nilai value baru pada perintah ANNOMONITOR yaitu "0" tanpa petik

Fungsi dan nilai-nilai pada Annomonitor serta fungsi kegunaannya adalah

2 -- Annotation monitor is on.
1 -- Annotation monitor on.
0 -- Annotation monitor off.
-1 -- Annotation monitor off.
-2 -- Annotation monitor off. However, 

Jadi kalo mau bener2 kagak muncul lagi kasih aja value -2 di jamin aman, oke guys semoga trik singkat ini bermanfaat, 

untuk kurang dan lebihnya mohon dimangapkan, sekian dari saya sampai ketemu di postingan berikutnya see you babay.

Cara mudah mendapatkan Trophy di COC


Selamat malam guys, mungkin lebih tepatnya kalo di bilang pagi kali ya hehe, karna saat gw nulis postingan ini tepat pukil 1.01am alias jam satu subuh, oke guys langsung aja ke topik pembahasan kita kali ini.

Jadi pada kesempatan kali ini gw akan membagikan sebuah trik simple yang banyak di pake ama temen2 gw saat main COC agar trophy nya cepet naik, oke jadi begindang, ada beberapa trik yg bisa di pakai, yang nanti akan gw jelaskan satu persatu. oke langsung cekidot.

Pertama adalah meemposisikan th di bagian gak terlalu ketengah tapi banyak trapnya atau jebakannya, hal ini di maksudkan agar lawan yg mau menyerang terpancing menyerang TH padahal banyak trapnya, jika dia ragu dan gak yakin sama troopsnya maka dia akan mundur dan alhasil ente dapet trophy nya dari hasil lawan yang menyerah.

Kedua adalah mencari th di luar yg sengaja dilakukan pemain lain agar kita gak ngeloot atau sengaja filakukan untuk menurunkan trophy, supaya dapet lawan yang gampang. cara ini susah susah gampang sebenernya, pertama harus nyari yg THnya di luar dan itu susah binggo, kalo lagi gak HOKI ampe lebaran 2 x juga kagak dapet tuh TH di luar, tapi kalo dapet kadang ada kendala, yaitu TH nya mengandung formalin, eh maksud ane mengandung traps, alias jebakan betmen, biasanya sih yg paling cepet melumpuhkan trapsnya berupa hiden tesla, apa lagi yg udah di upgrade ke level tinggi, beeh itu bikin esmosi, tapi tenang saya punya solasinya, cara yang biasa saya pake kalo ketemu base seperti di atas adalah attack pake archer, pastikan archer di posisikan di tempat yg di luar jangkauan tesla, kalo masih juga kena, ya saatnya membuat keputusan bijak, biasana kalo keadaan begini, ane sih tuang semua tuh troops yg ane bawa, yg penting th rata, lagian kan lagi nyari Trphy ya kudu konsisten hehe.

yang ketiga ini trik temen ane, kalo ane sendiri belum pernah, katanya biar tropynya awet atau kalopun ngudabg sedikit, ya jadiin th itu sasaran, atau tumbal, biar de dan gold kita kaga di jamah ama para fakir coc yg mengais gold dan de hhe, katanya kalopun ngurang paling 4-11 aja udah gitu kita dapet shield lagi kan lumayan, bisa ngejaga ketika kita offline.

Oke dah guys, kalo kalian punya trik yg lebih menggila silahkan komen, atau contact me biar trik ente ane pajang sekalian di postingan ini, semoga bermanfaat, sampai jumpa di postigan selanjutnya see you next time good byeeee.

Desain ruang fitnes sederhana


sebuah konsep desain modern cocok untuk ada yang ingin memiliki ruang fitness pribadi namun dengan budget yang minim, 

deaain ini juga bisa di terapkan jika anda memiliki kamar tidur yang sudah tidak terpakai, karena desain ini hanya mengakan ruangan tidak lebih dari 3x3,5 m2

How To Play Harvestmoon Back To Nature On PC or Notebook


Well, for those of you who are confused already here and there but could not find the download link emulator ePSXe, here I show a download link ePSXe emulator complete (+ Plugins, + BIOS, + Memory Cards, etc.). Hopefully you-you can use as well as possible. As well as for you-you who do not understand the settings in the running emulator ePSXe, let me give a simple guide, hopefully this can help with all of the play PS1 games using this ePSXe emulator.Download ePSXe 1.6.0 (include Plugins, BIOS, etc)(http://www.mediafire.com/?dkqng6h3bia66fr)SETTING ePSXe >>> VERY IMPORTANT !!!

    
Open 'ePSXe', which first must be done (the most fatal and often forgotten) was: Click 'Run'> 'Enable Logs' (tick). If not checked, when we finished playing and clicking close ePSXe, the game will still continue to run which will consequently affect CPU performance computer.
    
Click 'Config'> 'Wizard Guide', click on 'Config >>'.
    
Select the BIOS you want (I suggest to use the 'SCPH1001 - USA'), click on 'Next >>'.
    
Select GPU (video plugin) that you want (I recommend the use of the 'Soft PEOp.S. 1:17 Driver', setting and others will be explained in the next section), click on 'Next >>'.
    
Select SPU (Sound Plugin) that you want (I recommend the use of the 'Eternal SPU Plugin 1:50', click 'Next >>'.
    
Select CD-Rom plugin you want (choose whichever, everything is good), click 'Next' >> '.
    
click 'Controller 1'. If you already have a USB Controller, just set in accordance with the available buttons by clicking the Name button, then press the button on the USB controller in accordance with the supplied (when the USB Controller is used has a Dual Shock / analog, click the panel located on the upper right window, then select 'Digital / Analog (F5)' which allows the use of analog ePSXe shakes), click OK. Wherever you decide to stick to Player 2, click 'Controller 2' and follow the steps as mentioned above, click on 'Next >>'.
    
Congratulations! You have set the contents ePSXe correctly. To use and more efficient performance, it is advisable to follow the steps below.
IMPORTANT!!!

    
ARRANGEMENTS FOR GPU: 'Config'> 'Video' (I suggest to use 'PEOp.S. Soft Driver 1:17' because it is easy in the settings)> 'Configure'.
    
Tick ​​the 'Fullscreen mode' if you want a full screen display; or mark on the 'Window mode' if you want the display screen in the form of windows (to the ideal size 'Window mode', I suggest adjust its size be 720x576).
    
For 'Framerate', check the 'Use FPS limit' and tick 'FPS limit (10-200) FPS' (the default number is 60-70 FPS, if more than that, the speed / pace of the game will be faster; and vice versa), click OK, click OK again.
    
ePSXe allow you regulate the use of 'Memory Card' at will you. How: 'Config'> 'Memory Card'. To set the 'Memory Card 1' / 'Memory Card 2', click 'Select' then search for and select the 'Memory Card' where you want to use, click OK.
    
You can also delete / copy the contents of 'Memory Card' (even could double 'Memory Card' itself). Here's how: Go to the folder where the icon ePSXe is, find the folder 'Memcards'. There you will find many of the files 'Memory Card' (you can multiply it as many times as you want). To delete / copy the contents of 'Memory Card', run the program 'MemManager' (I feel no need to explain as to set a very simple and easy to understand).
(*) MEASURES TO PLAY THE GAME PS1 VIA ePSXe (*)To my knowledge, to be able to play PS1 games using ePSXe, there are two ways, namely:

    
Prepare CD PS1 games you want to play (try still in good condition and no blisters). Attach the game CD into the CD / DVD drive, insert, and then open the "ePSXe '>' File '>' RUNCDROM '. Wait a moment then the game display will appear (if it had been awaited for some time but the screen is still black does not show anything, maybe there is something wrong with the settings emulator you. Please check again the settings ePSXe; follow the steps that are above carefully . Or maybe CD PS1 games that you enter in the state is not good, try using the CD game that lenses still smooth).
    
Another way to be able to play PS1 games using ePSXe, by running the file 'ISO' of a particular game. To get the file 'ISO' is, you can download it at certain websites (the locations will I show in the next section). We can also create your own files 'ISO', the condition you have CD games are in good condition (no scratches) and a software called 'Alcohol 120%' (I recommend to use the above version 1.9.6, will I show its download link and on how to use I will describe in the next section). If you already have a file 'ISO' her, buka'ePSXe'> 'File'> 'RUN ISO'. Wait a moment then the game display will appear (if it had been awaited for some time but the screen is still black does not show anything, maybe there is something wrong with the settings emulator you. Please check again the settings ePSXe; follow the steps that are above carefully . Or it may be a file 'ISO' that you are using is corrupt or in the process of making his image is still not perfect).
You can download the file 'ISO' your favorite PS1 games from the following websites: (I can guarantee 100% if the game you are looking for must be here, but who knows ... Happy downloading!)(http://www.mediafire.com/?vg4dv8tiey238)(http://romhustler.net/roms/psx)(http://www.coolrom.com/forums/forumdisplay.php?f=31)(http://www.emuparadise.org/roms/psx/)(http://www.romulation.net/PSX/)(http://www.rom-freaks.net/psx-isos-0-asc-name-.html)(http://rom-gods.net/roms/Playstation/A/)(http://www.doperoms.com/roms/Sony_Playstation_Psx.html)(http://www.get-your-rom.com/roms/PLAYSTATION-ROMS/)'ISO' HARVEST MOON: BACK TO NATURE:B. English (http://www.5shared.com/file/9dIVgTkh/Harvest_Moon_-_Back_to_Nature_.html) {5shared changed to 4shared}B. Indonesia (http://www.mediafire.com/?la0xvciuw1ojj5l)(*) STEPS Installation & USE OF ALCOHOL SOFTWARE 120% (*)Download ALCOHOL 120% Retail v1.9.8.7612 Final:(http://www.mediafire.com/?8pyxybpqygwkyy5)
[*] STEPS installation ALCOHOL SOFTWARE 120% [*]Here Alcohol 120% is used to create the file from the CD image PS1 game into a form which is called 'ISO'. First of all, first download its software, after which I will explain about installasinya hint: (there are times when the installation program tells you to restart / reboot your computer, follow the procedure!)

    
Open 'Alcohol 120% Retail v1.9.8.7612 Final', then the language selection panel will appear; Select English (explanation of the installation will be in English), click OK.
    
After the 'Installation Wizard' will appear (I recommend close all running applications during this installation), click 'Next>'.
    
Here will appear the dialog 'License Agreement', just click 'I Agree'
    
After that will come the dialog 'Choose Components', you can give a check or emptying it up to you. Click 'Next>'.
    
Now the installation process will be started, click 'Browse' if you want to put / keep the program Alcohol 120% made in your own folder (for default in C: \ Program Files \ Alcohol Soft \ Alcohol 120). If so, just click 'Install'.
    
The installation process takes approximately 2 minutes, so be patient !.
    
If the installation process is complete, a dialog window will appear. You can uncheck the 'Add Alcohol Virtual Drive at First Run', it's up to you. When finished, click 'Finish'.
    
Unfortunately, Alcohol 120% requires a 'register' to be used. Well, to anticipate, now open the folder where the installation executable file 'Alcohol 120% Retail v1.9.8.7612 Final' is located. There are file 'RMK-Free Loader', run the file.
    
After that a dialog window will appear (remember! You already have to install the "Alcohol 120% Retail v1.9.8.7612 Final 'before running this software). Just click 'Crack!', Then automatically Alcohol 120% would ter'register 'and now you can use as you please.
[*] MEASURES USE OF ALCOHOL SOFTWARE 120% [*]After you successfully install the software Alcohol 120%, it means that now you can make the file 'ISO' own CD PS1 game belongs to you, here are the steps in making the file 'ISO' using software Alcohol 120%:

    
All you have to prepare is a PS1 game disc you want to create a file 'ISO' his (Remember the condition of his game CD must still good, which is important not too scratched lens).
    
Install and enter the PS1 game CD into the CD / DVD-Drive, and then run Alcohol 120%. After the program display appears, note on the left there are panels that form of 'Main Panel', 'Options Panel' and 'Help Panel'.
    
Focus on the 'Main Panel', you click "Image Making Wizard" will display a dialog window.
    
You can specify the CD / DVD-Drive where you want to use ('DVD / CD Device:') of course the CD / DVD drive that contains your CD PS1 games and also you can define the read speed CD PS1 games on CD / DVD- Drive you ('Read Speed:', the fastest on the speed 'Maximum' but I suggest you do not use the 'Maximum', use the 24X to 32X speed in order not to overload the CD / DVD-drive you). Furthermore, on the other settings do not need any changes, just click 'Next>'.
    
In the 'Image location: "specify where the file' ISO 'you want to save (the default in the My Documents \ Alcohol 120%). In the 'Image name:' you can give the name of PS1 games will you create a file 'ISO' her. Then the panel "Image format: 'of course select' Standard ISO image file (* .iso) '. Once everything is completed, click 'Start'.
    
The process of making files 'ISO' begins, because in the process tolerable time-consuming, to kill the time you can do something else (eg watching the ball, clean room, nguber neighbors chickens, anything that is important to spend time). ^ _ ^
    
If the process of making files 'ISO' has completed / 100%, automatically CD / DVD-Drive will be open and the main menu will appear Alcohol 120% results file 'ISO', which you made and can be directly playable in ePSXe.
(*) TIPS IN PLAY (*)

    
You can 'save / load "your game without having to use the facilities' Memory Card' which here is called 'Save State / Load State'. If you want to 'save' the middle game, simply press the 'F1', the game will automatically save the data. For'load clicking 'simply press the' F3 ', the game will return to when you last time clicking' save '. There are 5 pieces 'Save State / Load State' for each title game, to replace the 'Save State / Load State' to each other, press the 'F2'.
    
If you want to make a 'screenshot' or pictures of the event / something found on the game you are currently playing, simply press the 'Print Screen Sys Rq' (located to the left of the 'Scroll Lock' or the next on the 'Insert' on your computer keyboard). After that, get out of ePSXe (not necessarily in the 'close'), open software 'Microsoft Paint' (I do not need to tell the location where), in 'Paint' and then you click 'Edit'> 'Paste (or it could be in the 'Paint' press 'Ctrl + V'), the image of the game that you played earlier will appear (now you live edit, eliminating images that do not need, then 'save' an image you've edited).
(*) COVER (*)Thus I created this guide. I am aware of these guidelines is far from perfect, I hope I hope this guide can help you who want / are playing a game using a PS1 emulator ePSXe more perfectly. If there is criticism, suggestions, impressions, and questions regarding these guidelines please ask. Finally, thank you for your attention and happy playing! ^ _ ^

Great Living Room


Anyone you ask would probably say that they’d love to have a brand new LCD TV in their living room or den. Aside from entertaining you and your family; sometimes, the bigger your TV screen is, the more fun it is to invite your friends over to watch a great movie or have a TV series marathon with them. Well, basically, having a television in the living room aids us from really just chatting and hanging out at home.

Today, we will be showcasing 15 Modern Day Living Room TV Ideas which help us with how we can display the beautiful LCD TVs we have at home; or even the older models – some of the designers or the homeowners show off their TV screens or plainly put a painting on top of it to hide it when it is not needed or being used. You will see the TVs being placed above a mantle, in the middle of the bookshelf or even by the cabinet. Check them out!

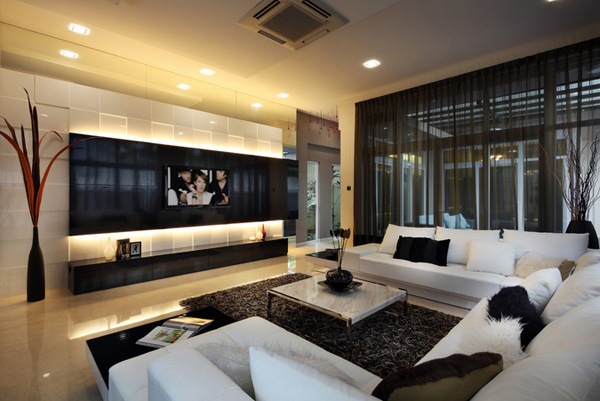
525a Upper Changi Road

525a Upper


The white panels are made from acrylic panels whereas the black material is black colored glossy laminates which really brings out the beauty of this living room. Using the classic black and white color palette made a lot of difference.

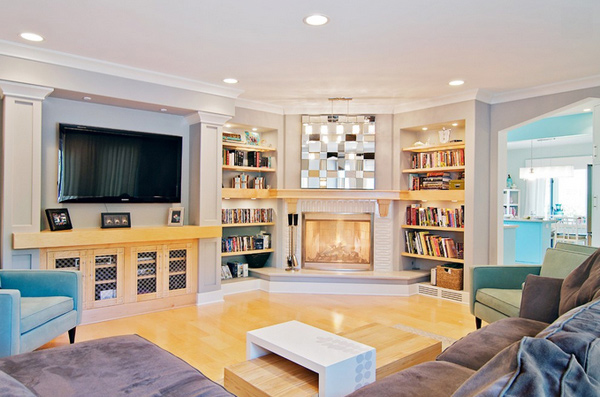
Art Deco Influence

Art Deco


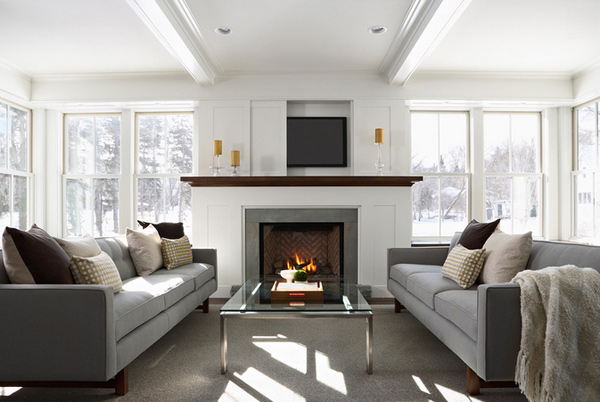
Flanked by dual bookcases, this corner fireplace vies for attention with a flat-screen television. But because it sits on a pedestal and upholds a beautiful mirrored panel, it’s a winner each time.

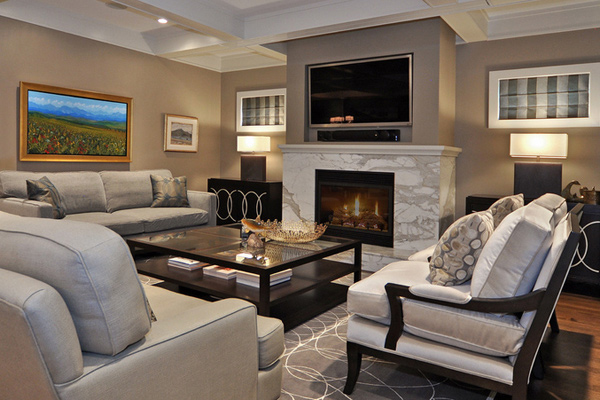
Calgary Contemporary Living Room

Associates Interior


We can see that the homeowners decided to actually place the television screen above the fireplace. It was recessed to the wall for it to just plainly mix with the wall design. The regular color of the TV complements well with the color palette of the living room.

Delaware Place

Delaware Place


This Chicago contemporary living room seem really masculine because of the darker colors used for it – from the dark wood for the TV console, the color of the seating and coffee table, even the curtains seem dark; but of course, they all complement the walls, the ceiling and the flooring.

Glasgow Family Room

Glasgow Family


The advent of flat screens gave rise to console tables and media cabinets. This freed up space and allowed for airier, lighter rooms. At the same time, better-looking TVs made it more acceptable to keep them out in the open.

Green Dream Home

Green Dream


In this living room, we see how smartly the designer and the homeowner would cover up the television set when it’s not in use. And during events, you can always let the TV covered while you add decorations on the mantle.

Lima Residence

Abramson Teiger


Putting up your television above a console may be the simplest thing to do but because of the great wall paneling done in this space, we can definitely say that it was well-thought of. Good job Abramson Teiger Architects!

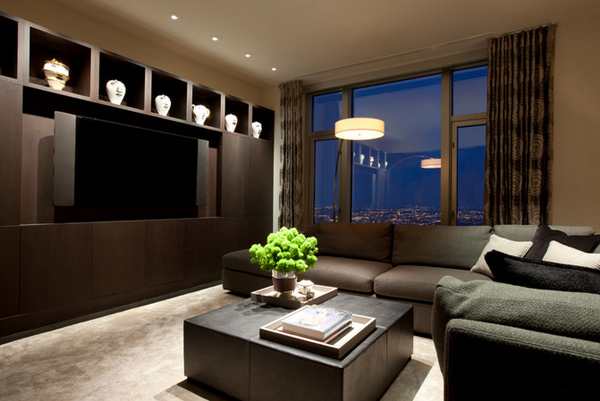
Montreal Media Room

Montreal Media


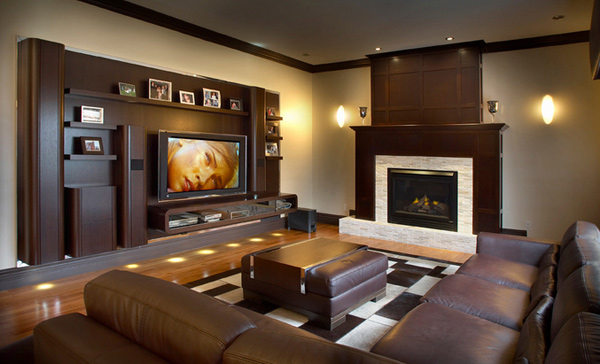
A warm inviting functional family room with a custom designed wall unit for motorized plasma bracket and integrate Bose stereo and speakers. Storage area was designed for DVDs and video games and equipment. The Italian oak custom wall unit is floating with a chrome frame and LED lighting above and below.

Northbrook House

Northbrook House


If you have a television, consider mounting it to the wall. Using swing arms and wall mounting a television set take away the need for a cumbersome media console and free up floor space from entertainment units.

Presidio Heights Residence

Presidio Heights


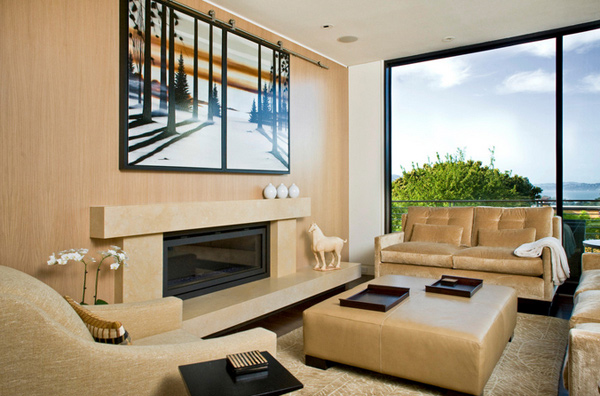
Here is another great example of keeping and at the same time showing off you television. You are basically putting the device in a hole and adding in an artwork in a sliding rail to use it. Pretty smart, don’t you think?

Spire Theater Room

Spire Theater


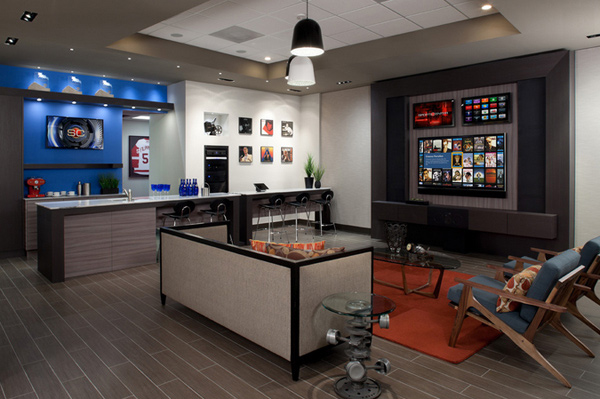
This media room is one techy space, not everyone can live in. But truth be told, that this is a space all teenagers would probably enjoy being in – its high-tech, its design is simple, its decor is awesome and it is not cramped.

Sunny Flat

Sunny Flat


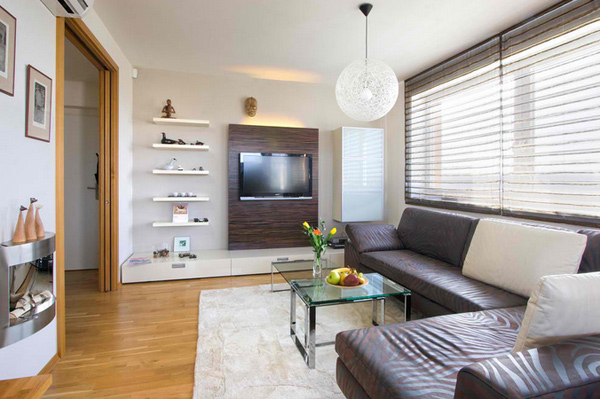
Neutrals, neutrals and more neutrals. Adding a stained dark wood behind the television cut the light color charade on the wall – it’s sleek, clean and really livable.

Tailor Made

Tailor Made


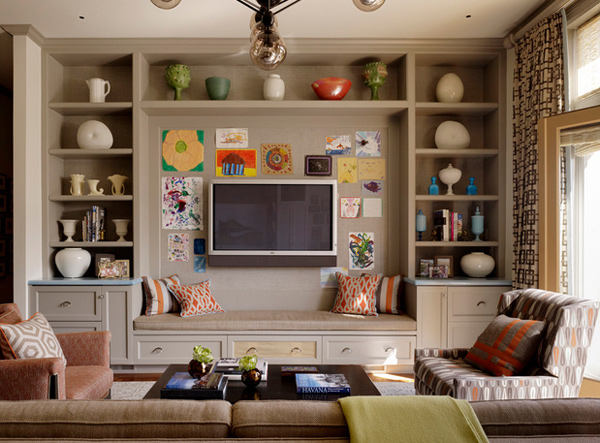
Knickknacks scattered around a room look more like clutter and tends to lose their importance. When grouped together they make a statement and become more relevant to the homeowner.

Small Wonder

Aqua WhiteSmall Wonder


Workshop/APD
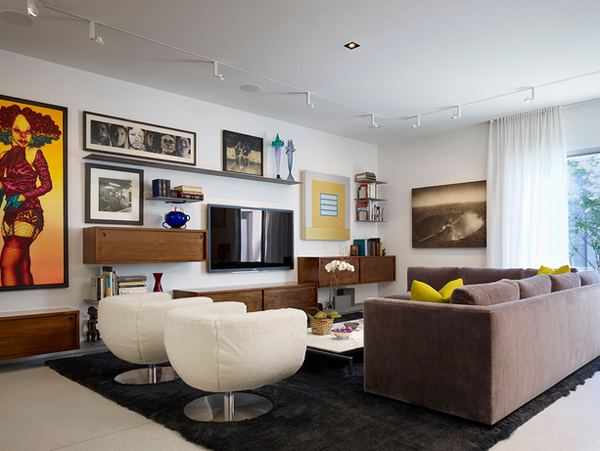
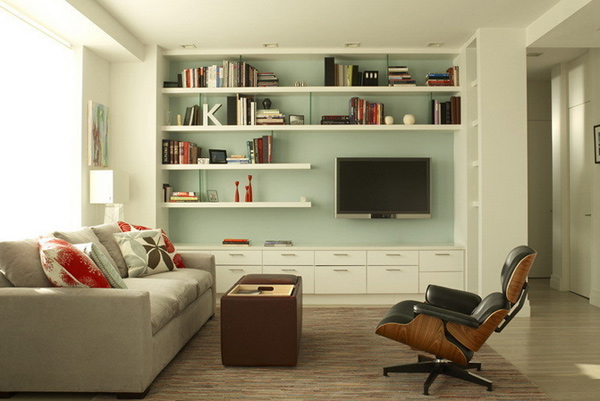
Use several shelves together to cover the full wall above the TV, and shorter lengths beside it; cabinets below provide closed storage for media and extra cords. Positioning the screen off-center looks fresh and can actually be more functional than a centered TV, depending on your seating arrangement.

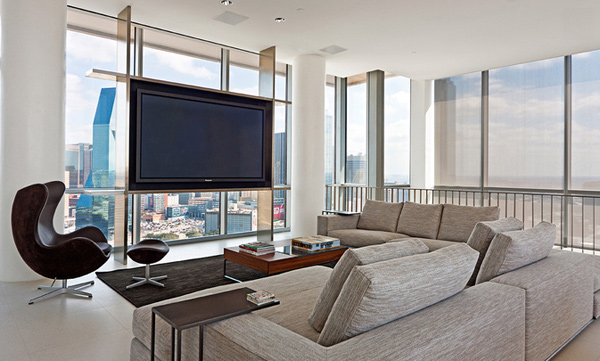
South Penthouse in Dallas

South Penthouse


For our last living room space, we have an all-white and beige space which is highlighted with the huge LCD TV screen and an awesome accent chair with a cute footrest and a brown-colored coffee table. Minimalist space for a stunning lifestyle.
Like the grey and green living rooms, the 15 Modern Day Living Room TV Ideas are but living room interiors that can help us in all the designs and layouts we actually need or want at home. Re-arranging and redecorating our living spaces is always a good thing because it gives us more inspiration with our day to day work. Maintaining one look for the living room is okay, but sometimes it gets boring, so add a little spice on your spaces just like the photos we have above! Hoped that this list help you one bit!

Download Autodesk Maya 2016 X64 Free


Sejarah
Autodesk Maya atau yang dulunya dikenal dengan nama Maya, merupakan software yang dirilis oleh  Alias Systems Corporation  kemudian selanjutnya di akusisi oleh Autodesk pada tanggal 4 Oktober 2005 dengan nilai sebesar US$ 182 juta, kemudian pada tanggal 10 Januari 2006 Autodesk melunasi proses akusisi tunai sebesar US@ 197 juta. Semenjak akusisi tersebut pemberian nama versi diganti  menjadi tahun terbit. Software ini adalah software berbayar bukan opensource yang harga lisencenya mencapai $3.500 (atau setara Rp. 31.500.000,-). Biasanya software ini dipakai oleh para developer film animasi atau juga pengembang software game-game berbasis 3D.

Pengertian dan kegunaan
Autodesk Maya atau sering disingkat menjadi Maya, adalah software desain grafis 3D yang mampu dioperasikan pada Windows, Mac, dan Linux. Pada awalnya software ini dikembangkan oleh Alias System Corporation (Alias|Wavefront), namun saat ini berada di bawah Autodesk, Inc.

Sebagai software modeling dan animasi 3D dapat dikatakan Maya adalah software 3D yang terpopuler kalau bukan yang terbaik pada masa kini, baik untuk modeling maupun animasi, khususnya character modeling dan character animation. Oleh karena itu, Maya memang lebih banyak digunakan untuk membuat character modeling dan animasinya, serta untuk mendesain efek spesial. Sedemikian komersilnya software Maya hingga industri perfilman Hollywood banyak menggunakannya dalam karya mereka, baik untuk pembuatan video clip, film animasi, seperti Finding Nemo, film pendek hingga karya besar berupa film kolosal semacam Lord of the Ring. Bahkan Alias Wavefront, pengembang software Maya, menerima penghargaan berupa piala Oscar untuk film Lord of the Ring.
Selain itu, Maya juga digunakan untuk membuat model-model 3D untuk keperluan produksi Game. Salah satu yang paling terkenal adalah Grand Tourismo. Buku ini menguraikan dengan gamblang bagaimana menggunakan Maya 5.0 untuk keperluan modeling 3D, animasi 3D, material, dan pencahayaan. Kekuatan utama buku ini terletak pada tutorial kasus yang menuntun Anda untuk menguasai Maya dengan cara belajar sambil bekerja (learning by doing). Setiap langkah-langkah penting dalam tutorial tersebut dilengkapi dengan penjelasan yang menguraikan fungsi dari langkah tersebut. Jika Anda seorang pemula atau bahkan belum pernah menggunakan Maya dan ingin menguasai bagaimana membangun desain 3D dan membuat animasi 3D menggunakan Maya, mungkin buku ini dapa menjadi "guru" yang menuntun Anda untuk menguasai Maya. Meskipun demikian, buku ini mengasumsikan bahwa Anda sudah terbiasa menggunakan sistem operasi Windows. Pembahasan dalam buku ini mencakup: - Alur kerja dan interface Maya 5.0 - Modeling - Material, Tekstur, dan Pencahayaan – Animasi.

Fitur- fitur
Sejak konsolidasi dari dua paket yang berbeda, Maya dan versi selanjutnya telah berisi semua fitur yang sekarang telah unlimited suite, fitur fiturnya antara lain sebagi berikut :

Fluid Effects
Ditamabahkan ke dalam Maya 4.5 yauitu  sebuah simulator cairan yang realistis yag efektif untuk  pembuatan asap, api, awan dan ledakan

Clasisic Clot
Simulasi kain untuk secara otomatis mensimulasikan pakaian dan kain bergerak realistis melalui karakter animasi. Toolset Kain Maya telah ditingkatkan di setiap versi Maya dirilis setelah Spider-Man 2. Alias ​​bekerja dengan Sony Pictures ImageWorks untuk mendapatkan Kain Maya sampai dengan awal untuk produksi itu, dan semua perubahan yang telah dilaksanakan, meskipun studio besar memilih untuk menggunakan plugin pihak ketiga seperti Syflex.

Fur
Hewan yang mirip dengan rambut di simulasikan oleh Maya. Hal ini dapat digunakan untuk mensimulasikan lainnya bulu-seperti objek, seperti rumput

nHair
Sebuah simulator untuk realistis tampak rambut manusia yang diimplementasikan dengan menggunakan kurva dan Efek Cat. Ini juga dikenal sebagai kurva dinamis.

 Maya Live
Satu set alat pelacakan gerak untuk CG cocok untuk membersihkan plate footage.

nCloth
Ditambahkan dalam versi 8,5, nCloth adalah implementasi pertama dari Inti Maya, kerangka simulasi Autodesk. Ini memberikan kontrol artis lanjut dari kain dan simulasi materi.

nParticiple
Ditambahkan dalam versi 2009, nParticle merupakan addendum toolset Inti Maya. ini adalah untuk mensimulasikan berbagai efek 3D yang kompleks, termasuk cairan, asap awan, semprot, dan debu.

MatchMover
Ditambahkan ke Maya 2010, hal ini memungkinkan composite elemen CGI dengan data gerakan dari urutan video dan film.

Composite
Ditambahkan ke Maya 2010, ini sebelumnya dijual sebagai Autodesk Toxik.

Camera Sequencer
Ditambahkan ke Maya 2011, Sequencer Kamera digunakan untuk gambar tata letak kamera ganda dan mengatur mereka dalam satu urutan animasi.

Kelebihan dan kekurangan

Kelebihan
Maya 3D memiliki kemampuan untuk kerajinan objek 3-D kustom dan memungkinkan pengguna untuk secara bebas dan mudah memanipulasi masing-masing titik individu yang memungkinkan untuk rasa kontrol dan fleksibilitas. Maya 3D memiliki kemampuan yang baik untuk kerajinan karya-karya seni visual jika digunakan dengan benar. Ini memiliki kekuatan besar dalam menyediakan pengaturan pencahayaan dan tekstur alat untuk membantu membuat objek terlihat lebih realistis.

Kekurangan
Meskipun Maya 3D adalah sebuah alat yang sempurna untuk kerajinan karya seni visual yang indah masih mengandung beberapa kelemahan yang Anda harus sadar. 3D Maya tidak berisi fitur Bi-PED seperti 3ds Max, yang berarti bahwa untuk menciptakan struktur rangka untuk karakter pengguna banyak membangun satu set “tulang,” banyak seperti membangun kerangka dari bawah ke atas. Hal ini dapat memakan waktu untuk melakukannya, terutama jika Anda membuat kelompok besar karakter untuk film atau video game. Juga, antarmuka untuk Maya 3D belum tentu sesuatu yang baik untuk pemula dan mungkin membingungkan beberapa pengguna pertama kali.


download.png

SketchUp Pro 2016 Full


SketchUp Pro 2016 now is out. SketchUp 2016 is more than you can imagine, still comes with its intuitive interface, easy-to-use yet powerful features. SketchUp is the easiest way to draw and sketch in 3D. The program focused on 3D modeling for a wide range of drawing such as architectural, mechanical engineering, interior design, landscapes, furniture, buildings, and other design. One more thing that is very interesting fromSketchUp that is 3D Warehouse features which enables you to download and use hundreds or even thousands of objects, models and 3D designs for free.
SketchUp Pro 2016 allows you to create accurate and highly-detailed models, it also allows surface rendering, and supports third-party plug-ins. SketchUp 2016 lets you add model to workspace, choose drawing scales, add dimensions, callouts, and graphics. SketchUp allows you to import files from other 3D modeling programs, export your SketchUp file for use with other modeling and graphic-editing software, create and share 3D models as animations, scenes, or printouts including with 3D printer.
What’s new in SketchUp 2016:
  • Enhanced inference engine
  • Expanded Arrow Key locking
  • Improved textures and categories
  • More control to Generate Report
  • New fast and precise modeling
  • New floating utility dialogs
  • New LayOut Application Program Interface
  • New LayOut cloud references
  • New Support for High DPI Graphics
  • New sync, reference, and share
  • Reload 3D Warehouse models
  • Other miscellaneous improvements.
Screenshots:


Download links:
SketchUp Pro 2016 Full Crack
Minimum Requirements:
  • Windows 7/ 8/ 8.1/ 10 (32-bit or 64-bit)
  • 2 GHz processor
  • 4 GB RAM
  • 300 MB disk space
  • 512 MB VRAM
  • OpenGL 2.0
  • Internet Explorer 9
  • .NET Framework 4.0
How to install?:
  • Disconnect from internet (Recommended)
  • Unpack and install SketchUp Pro 2016
  • Don’t run yet, then exit if running
  • Run as admin the Patch and apply it!#
  • #Locate SketchUp, LayOut and Style Builder
  • All the files (above) found on install dir
  • Run SketchUp 2016 from Desktop and enjoy!

    DOWNLOAD LINK
    SketchUp Pro 2016 only crack:
    – UsersCloud; 239.3 mb
    SketchUp Pro 2016 32&64bit Full Crack:
    – Media1fire; 239.3 mb
    – Openload; 239.3 mb
    – UsersCloud; 239.3 mb
    – UploadEx; 239.3 mb
    – TusFiles; 239.3 mb
    – Uptobox; 239.3 mb